How to find empty dirs with Total Commander
Download DirSizeCalc here:
https://www.ghisler.com/plugins.htm
Unpack the file somewhere.
Install plugin with Configuartion -> Plugins -> .wdx configuration
Click on Commands -> Search
Switch to plugins tab and activate search in plugins
Use 2 dirsizecalc configurations:
file count = 0
directory count = 0
Click on start search in the directory you like to start the search
How to open the task manager on a windows remote desktop (rdp) session
Ctrl + Alt + delete on local session will give you the option to open the task manager, but this is not working if you are using a remote desktop session and you want to open the task manager on the remote server.
Ctrl + Alt + end or Ctrl + Shift + Esc did the trick for me
Export Bookmarks or History on Android Chrome
You can get bookmarks and history dumps with the following shell commands:
adb shell content query --uri content://com.android.chrome.browser/bookmarks
adb shell content query --uri content://com.android.chrome.browser/history
I got the following error after running this command:
…
Permission Denial: opening provider com.google.android.apps.chrome.ChromeBrowserProvider
…
Do you have any ideas how to get the permission? I think the commands are only working on rooted devices.
With Browser History you can also search and backup your Browser History.
HTC One M8 – Android 5 Lollipop USB Debugging und Entwickleroptionen aktivieren
Die Entwickleroptionen sind ab Werk nicht aktiv und müssen zuerst freigeschaltet werden.
- Rufe das Menü deines Android-Smartphones auf und öffne die Einstellungen.
- Scrolle nach unten bis zum Eintrag “Info”.
- Tippe diesen Eintrag an und im nächsten Bildschirm dann auf “Software-Informationen”.
- Tippe dann ganz unten den Eintrag “Mehr” an.
- Tippe mehrfach auf den Eintrag “Build-Nummer”. Ein Popup zeigt dir an, wie oft du den Eintrag noch antippen musst, bis die Entwickleroptionen aktiv sind.
- Gehe danach zurück ins Hauptfenster der “Einstellungen”.
- Hier findest du nun zusätzlich den Eintrag “Entwickleroptionen”.
HTTP KeepAliveTimeout
What is the difference between:
Header set Connection keep-alive and KeepAlive on?
If you simply set the header Connection: keep-alive it isn’t going to be enough. The client will think it’s a keep-alive connection but the server may decide to close the connection. Additionally, the client doesn’t know how many requests can be served through the keep-alive connection. There’s an additional header that is used to track requests sent through a keep-alive connection that looks like this:
Keep-Alive: timeout=15, max=100
which tells the client that it can send up to 100 more requests on the current keep-alive connection (and it counts down as you continue to use said keep-alive connection) and that the client has 15 seconds to make any additioanl requests before the connection is closed.
Simply using the header isn’t sufficient to establish a keep alive connection because the server needs to negotiate it. Both ends need to know about the keep-alive and both ends need to do proper accounting. You need to tell the server to handle keep-alive on its end and simply sending the header isn’t going to do that. You need to turn keep-alive on using the second directive:
KeepAlive on
And additionally, you can tweak the keep-alive mechanism with directives like:
KeepAliveTimeout 15
MaxKeepAliveRequests 100
Checkout Google Chromecast
What’s so great about Google Chromecast
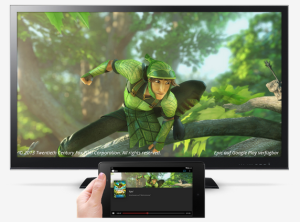
Google Chromecast is a very cool small device based on a simplified version of Chrome OS , which connects to the Wi-Fi local area network and is able to play audio and video streaming. With compatible apps installed on a smartphone or tablet, or on a PC with Google Chrome you can use it as a digital media player for your audio/video content on a high-definition display by directly streaming it via Wi-Fi from the Internet or your local network. It also allows you to stream your local videos from your Android device, computer, NAS, and other network locations to your big screen.
The big draw here is that it supports virtually any video or audio file type you have. Users select the media to play using Chromecast-enabled mobile apps and web apps. Alternatively, content can be mirrored from the Google Chrome web browser running on a personal computer, as well as directly from the screen of some Android devices.

The device, a 2.83-inch (72 mm) HDMI dongle
How it works
Streaming is actually carried out by the device and not the smartphone that simply sends the address of the stream and the metadata for the screen interface and playback control. Unlike Apple’s AirPlay, whose support is “cooked” in iOS , OS X and iTunes (on a PC), Chromecast is multi- platform and compatibility is at the application level. For example, the YouTube app Chromecast support on Android that iOS. The experience of use in this case is very similar to that of AirPlay, since the applications are able to automatically detect the presence of Chromecast on the net and all you need is to select the appropriate icon to start playing on TV.

Google Chromecast dongle connected with TV
How to make the most of Google Chromecast
Apps for Chrome
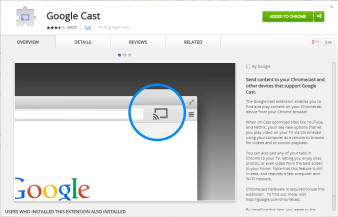
- Google Cast: The Google Cast extension enables you to find and play content on your Chromecast device from your Chrome browser.
- Videostream lets you stream local videos (downloads, etc.) from your computer to your Chromecast in full 1080p!
Apps for mobile devices
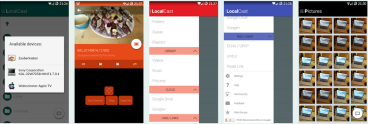
- LocalCast lets you stream videos from your phone’s Gallery (or from Dropbox or Google Drive) to a Chromecast.
- PlayTo Chromecast lets you stream Photos, Music & Videos from 150+ websites, your phone or other media servers to your Chromecast. PlayTo supports website based media streaming, media from media servers and media on your phone or tablets.
Where Chromecast Wins Out
- It’s a very smal device: Unlike other set top boxes, the Chromecast takes up virtually no space. If you have an open HDMI port and a place to plug in the power, you’ll never even see the little device.
- Your phone is your remote: While remote controls have been one of the most beloved technological advances of the 20th century, they’re also very rudimentary and easy to lose. We tend to be much better at keeping up with our phones. While Apple TV users can download a remote app for the iPhone, the Chromecast remotes tend to be cross platform.
- More importantly, your app is your remote: With the Chromecast, your “remote control” is the native app of whatever you’re watching rather than some direction pad and set of buttons. It’s an app designed for mobile, and instead of clicking around a menu, you’re picking your media from the app’s normal menus. It’s a much nicer experience. While not every company does this perfectly, the big names like Netflix, Hulu, and YouTube have done a good job. Note also that some devices like the Roku have smartphone-based remote control apps, but few are terribly well designed.
- (Some) apps are group activities: It’s inevitable: when you have company over, one person wants to play a YouTube video, then everyone wants to join in. One of the neat things about how the YouTube app handles the Chromecast is that anyone can do so, and they can even add a video to a shared playlist to make things easy.
- Tab casting is always a fallback: While the feature can be a bit wonky, the Chromecast is able to stream video from any Chrome tab on your PC to your TV. It’s not an ideal solution, but if you want to play videos from a less popular streaming site (say, a television network’s own video player), tab casting is always an option. On an Apple TV or Roku, if a service isn’t supported you’re just out of luck.
- It’s insanely cheap: It should go without saying that the biggest advantage the Chromecast has is its price. Not only is it normally $35, which is about the cheapest you can get for a device like this, but you can often find deals where you get a discount or even a free Chromecast with the purchase of something else.
How to enable remote key support with Citrix
With the following registry entry one can enable the remote key support of „Alt Tab“ and the Windows key for a Citrix environment. Add the entry to your Windows registry and restart Citrix:
[HKEY_LOCAL_MACHINE\SOFTWARE\Wow6432Node\Citrix\ICA Client\Engine\Lockdown Profiles\All Regions\Lockdown\Virtual Channels\Keyboard]
"AlwaysSendPrintScreen"=""
"EchoShiftKeys"="*"
"KeyboardMappingFile"=""
"KeyboardLayout"=""
"KeyboardType"=""
"KeyboardSendLocale"="*"
"KeyboardTimer"="*"
"LocalIME"=""
"ScancodeEnabled"="*"
"TransparentKeyPassthrough"="Remote"
"UnicodeKeyboard"=""
"UseEUKS"="*"
Delete Files/Folders with Robocopy
To create a batch file to have Robocopy delete the folder, create a text file called DelFolder.bat containing the following code:
@echo off
if {%1}=={} @echo Syntax: DelFolder FolderPath&goto :EOF

if not exist %1 @echo Syntax: DelFolder FolderPath – %1 NOT found.&goto :EOF
setlocal
set folder=%1
set MT=”%TEMP%\DelFolder_%RANDOM%”

MD %MT%
RoboCopy %MT% %folder% /MIR
RD /S /Q %MT%
RD /S /Q %folder%

endlocal
The usage of this batch file is: DelFolder.bat PathToDelete
How to execute several maven plugins within a single build phase and set the respective execution order
You can use the build lifecycle or phases to control the order of the plugin execution. In some scenario, you have to bound few plugins to same phase, but still want to control the order of the plugin execution.
Plugins bound to the same build phase should be executed in the same order as they are listed in the POM. But under certain circumstances , the order is not executed in the expected order, see this MNG-2258 and MNG-3719. This bug is fixed in Maven 3.0.3. With Maven 3.0.3 and above plugins bound to same phase will be executed in the same order as they are listed in the pom.xml.
If you have to use an older Maven version you can spread the tasks to different phases. But I dont think there is much sence for this solution. You can also do one of the following to solve the problem:
- try your luck and see if Maven chosses the right order for you (you probably tried that already)
- use standalone plugin – run the goal outside the lifecycle. something like: mvn package org.codehaus.mojo:nsis-maven-plugin:1.0:compile.
- separate them into module: have a parent pom containing two sub modules, one – your war project and the other for the nsis project.
- use a custom lifecycle by changing the type, in your case you can use “exe”. this is done by using a custom plugin extension (guide to using extension)
- use the jetspeed-mvn-maven-plugin. I have never used it but it seems relevant to your needs.
AAX in MP3 umwandeln
Das Audible-Dateiformat (.aax) kann durch einen kleinen Umweg in das MP3 Format umgewandelt werden.
Zunächst werden die beiden Programme Virtual CD (die 30 Tage Demo Version ist kostenlos) und iTunes. Nach dem Herunterladen und Installieren gehen Sie wie folgt vor:
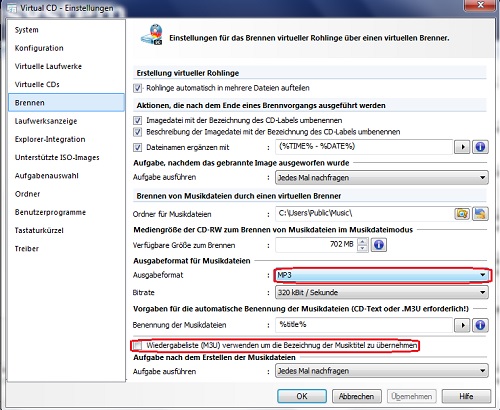
- Öffnen Sie “Virtual CD” und wählen dort “Einstellungen bearbeiten” aus. Klicken Sie auf der linken Seite auf “Brennen”.
- Dort wählen Sie bei “Ausgabe Format” MP3 aus und versichern Sie sich auch, dass der Haken bei “Wiedergabeliste verwenden um die Bezeichnung der Musiktitel zu übernehmen” entfernt ist. Bestätigen Sie mit “Übernehmen” und “OK”.
- Öffnen Sie erneut das Programm und klicken auf “Virtuellen Rohling einlegen” und anschließend auf “Musikdateimodus aktivieren”. Die nachfolgende Meldung bestätigen Sie mit “OK”.
- Nun öffnen Sie iTunes und wählen über den Menüknopf oben links “Datei zur Mediathek hinzufügen”. Öffnen Sie die Datei, die Sie konvertieren möchten.
- Wählen Sie die Datei in iTunes an und drücken Sie STRG, Umschalttaste und N gleichzeitig. Sie haben eine Wiedergabeliste erstellt, die Sie nun brennen können. Mit einem Klick mit der rechten Maustaste auf die entsprechende Liste können Sie diese brennen.
- In den Einstellungen, die sich nun öffnen, müssen Sie das virtuelle Laufwerk sowie den Menüpunkt “Audiodatei” auswählen, und können anschließend auf “Brennen” drücken.
- Nach dem Brennvorgang finden Sie die fertige MP3-Datei im Verzeichnis von Virtual Burn. In den Standardeinstellungen ist die Datei unter C:\CDsVCD zu finden.
Falls iTunes Sie auffordert einen leeren Rohling einzulegen, gehen Sie erneut zu den Einstellungen von “Virtual CD” und versichern Sie sich, dass bei den virtuellen Laufwerken der Brenner ausgewählt ist.


